Crispy Buttermilk Chicken Tenders Recipe, Easy American Dinner in 35 Minutes
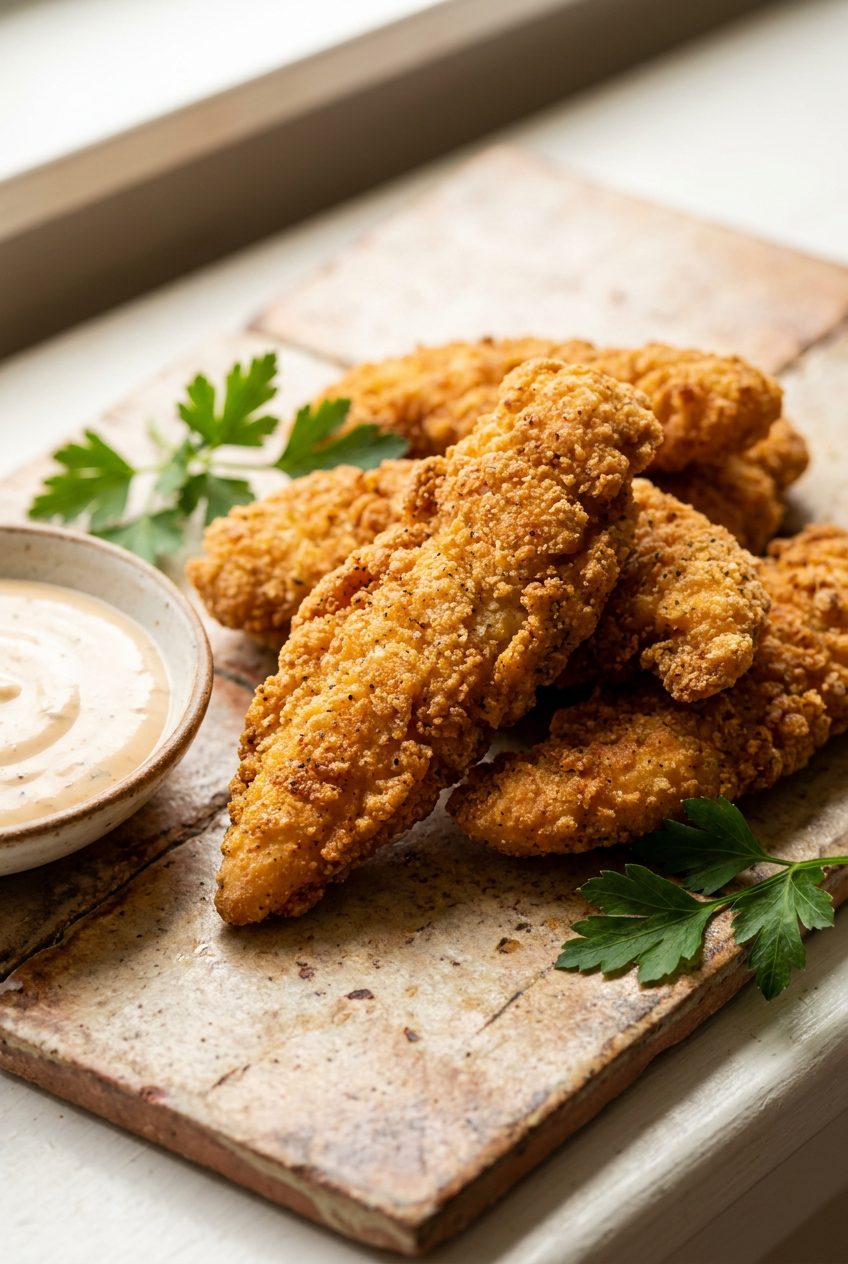
Table of Contents
- Crispy Buttermilk Chicken Tenders: Golden, crunchy on the outside, juicy on the inside
- Why You Will Love This Crispy Buttermilk Chicken Tenders Recipe
- Your Simple Ingredients for the Perfect Crispy Buttermilk Chicken Tenders
- How to Make Perfect Crispy Buttermilk Chicken Tenders
- Pro Tips and Easy Variations for Your Crispy Buttermilk Chicken Tenders
- Serving Suggestions
- Nutrition Information
- Storage and Make-Ahead Instructions
- Your Crispy Buttermilk Chicken Tenders Questions Answered
- More Incredible American Recipes to Try
- The Story Behind This Recipe
- Pin This Recipe for Later
Crispy Buttermilk Chicken Tenders: Golden, crunchy on the outside, juicy on the inside
I still remember the first time I pulled a batch of homemade chicken tenders out of hot oil and watched my family descend on the platter before I could even set out the dipping sauces. There is something universally irresistible about a perfectly fried chicken tender, that first audible crunch giving way to steaming, tender meat underneath. This crispy buttermilk chicken tenders recipe is the result of years of tweaking and testing, chasing that exact texture I remember from my favorite childhood diner but could never quite replicate at home until now. The secret is in the details: a tangy buttermilk bath that seasons the chicken from the inside out, a well-spiced flour coating that clings beautifully, and the patience to let the breaded tenders rest before they hit the oil. It is the kind of recipe that turns an ordinary weeknight into something that feels a little celebratory.
What sets this crispy buttermilk chicken tenders recipe apart from others you might have tried is the combination of a few non-negotiable techniques. First, the marinade is a flavor vehicle, not just a dunk. The buttermilk tenderizes the meat while the hot sauce and salt work their way into every fiber, meaning every bite is seasoned all the way through. Second, the breading has just the right ratio of flour to spices, with a whisper of cayenne that does not scream heat but adds a warmth that makes the coating more interesting than plain flour alone. And finally, there is a critical resting step after breading that essentially glues the crust to the chicken before it ever touches the fryer. This is not just a recipe where you dip and drop. It is a method that guarantees reliable, golden results every single time. If you have ever struggled with soggy bottoms or coating that slides off in the pan, this method will be a revelation.
This recipe is for everyone, from the busy parent who needs a 35-minute dinner that will earn enthusiastic approval from the whole table, to the home cook who wants to master the art of frying without fear. It is perfect for game day spreads, casual Friday dinners, or a fun project to tackle with kids who love to help with the breading station. The truth is, once you know how to make Crispy Buttermilk Chicken Tenders from scratch, you will find it hard to go back to the frozen aisle. They are that much better. I often make a double batch and freeze half, which means a future version of me gets to feel like a hero on a night when I have zero energy to cook. If you have been searching for easy Crispy Buttermilk Chicken Tenders that deliver honest, homemade flavor without fussy ingredients, you have landed in exactly the right place. For a completely different but equally satisfying comfort food experience, you might also enjoy my Moroccan chicken tagine, but today it is all about that perfect crunch.
Why You Will Love This Crispy Buttermilk Chicken Tenders Recipe
- Unbeatable crunch that actually stays crunchy. The combination of a well-seasoned flour dredge and a proper resting period creates a crust that shatters beautifully when you bite into it. Even after sitting on the counter for a while, these tenders hold their texture far better than most homemade versions.
- Juicy, flavorful chicken every single time. The buttermilk marinade does double duty: it tenderizes the meat so it stays impossibly moist during frying, and it carries salt and hot sauce deep into the chicken. You will never bite into a bland, dry tender again.
- Quick enough for a weeknight, special enough for guests. With just 20 minutes of prep and a short cook time, this is a realistic Tuesday dinner option. But the golden, craggy crust and that homemade touch make it feel like something you would order at a restaurant.
- Completely customizable to your taste. You can adjust the cayenne up or down, swap in smoked paprika for more depth, or even go the Nashville hot route with a spicy oil brush after frying. These tenders are a perfect blank canvas.
- No special equipment required. You do not need a deep fryer to get perfect results. A heavy-bottomed pot or Dutch oven and an inexpensive thermometer are all it takes to achieve crispy, non-greasy chicken that rivals any fast-food version.
- Freezer-friendly for future cravings. These tenders freeze beautifully after frying, meaning you can make a large batch and reheat them straight from frozen. Having homemade Crispy Buttermilk Chicken Tenders on standby in the freezer is a gift to your future self.
Your Simple Ingredients for the Perfect Crispy Buttermilk Chicken Tenders
Marinade
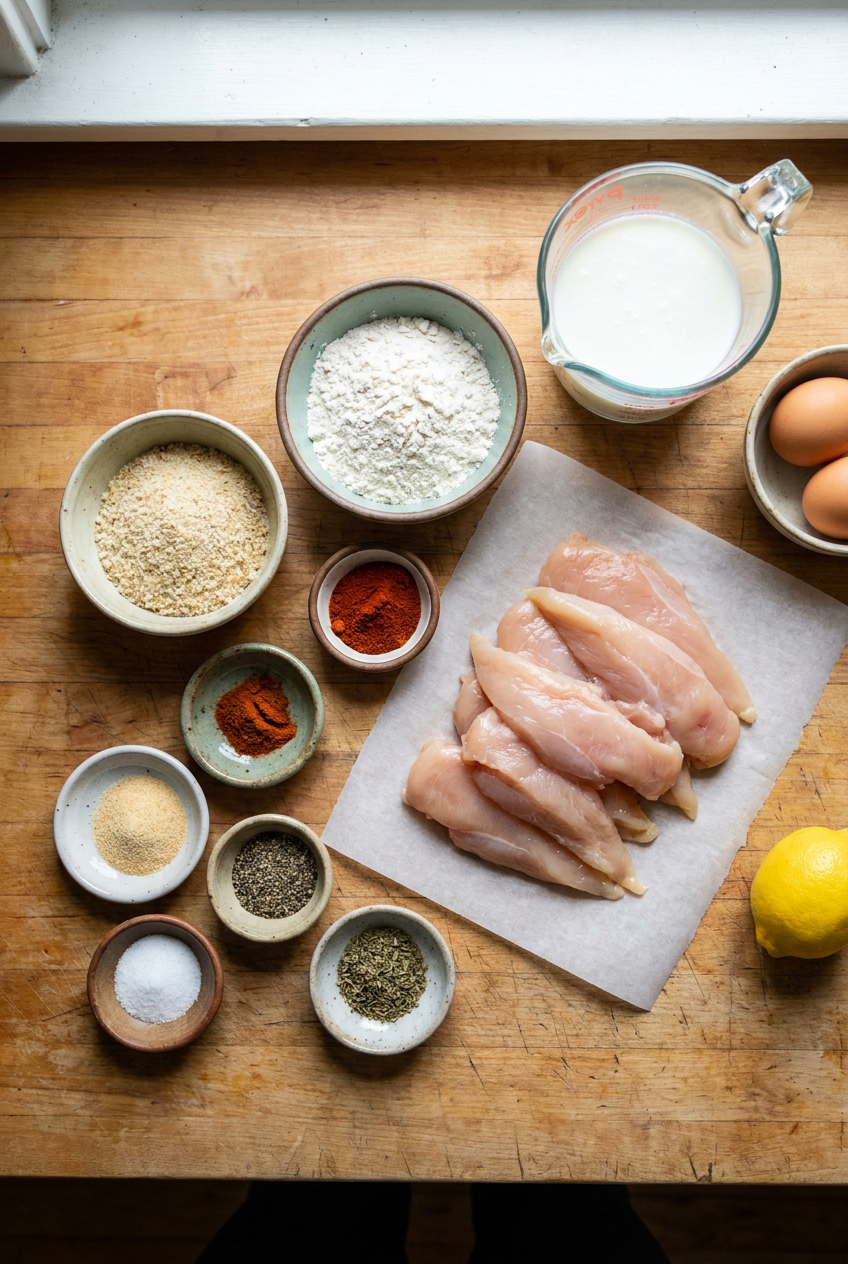
- 1½ lbs chicken tenderloins, or boneless skinless breasts cut into strips
- 1½ cups buttermilk, well shaken
- 1 tsp hot sauce, optional, for flavor
- 1 tsp kosher salt
- ½ tsp freshly ground black pepper
Breading
- 2 cups all-purpose flour, spooned and leveled
- 2 tsp paprika, smoked or sweet
- 1 tsp garlic powder
- 1 tsp onion powder
- ½ tsp cayenne pepper, adjust for heat
- 1 tsp kosher salt
- ½ tsp black pepper
Frying
- 4 cups vegetable oil, or peanut oil, for deep frying
Serving
- as needed flaky sea salt, for finishing
- as needed dipping sauces, ranch, honey mustard, ketchup
Ingredient Notes
Chicken tenderloins are the long, thin strips of meat attached to the underside of chicken breasts. They are naturally tender and perfectly sized for this recipe, requiring no trimming or slicing. If you cannot find them, buy boneless skinless chicken breasts and slice them lengthwise into strips about 1 inch wide. Look for chicken that is pale pink with no off odors, and avoid packages with excessive liquid pooled at the bottom. For the most even cooking, try to make your strips as uniform in thickness as possible.
Buttermilk is the non-negotiable workhorse here. Its acidity gently breaks down the proteins in the chicken, resulting in a noticeably more tender texture, while its thickness helps the flour coating adhere. Buy full-fat buttermilk if you can find it, the richness translates to a better crust. If you are in a pinch, you can make a quick substitute by stirring 1½ tablespoons of lemon juice or white vinegar into 1½ cups of whole milk and letting it sit for 10 minutes until it curdles slightly. It will not be quite as thick as real buttermilk, but it works well.
Hot sauce adds a subtle background warmth to the marinade rather than outright heat. I use a classic Louisiana-style hot sauce like Crystal or Frank’s RedHot. If you are serving this to young children or anyone sensitive to spice, you can leave it out entirely. The chicken will still be delicious. For a different flavor direction, try a few dashes of Worcestershire sauce instead.
All-purpose flour forms the structure of the crispy coating. Spooning it into your measuring cup and leveling off the top prevents you from packing in too much, which would make the breading heavy and dense. For a lighter, lacier crunch, you can replace up to half of the flour with cornstarch. This is a trick many restaurants use to get that delicately shattery crust.
Paprika brings color and gentle warmth to the breading. Smoked paprika adds a subtle barbecue note that I love, while sweet paprika is milder and lets the other spices shine. Either works beautifully here. Make sure your paprika is not old and dusty smelling, fresh spices make a real difference in a simple recipe like this one.
How to Make Perfect Crispy Buttermilk Chicken Tenders
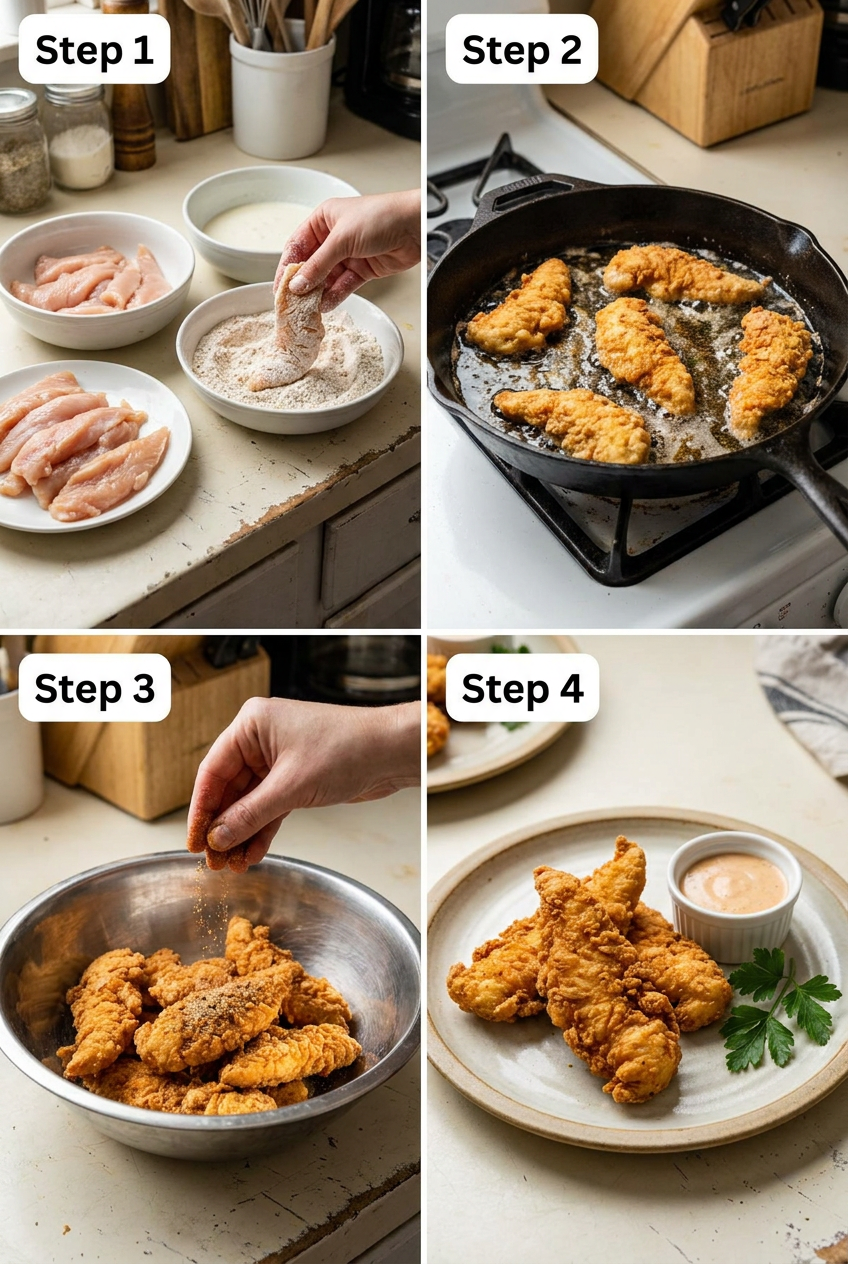
Phase 1: Marinate the Chicken
Begin by gathering a large mixing bowl. Place your chicken tenderloins into the bowl and pour the buttermilk over them, making sure every piece is submerged. Add the hot sauce if using, along with the teaspoon of kosher salt and the half teaspoon of black pepper. Use your hands or a spoon to gently toss everything together until the seasonings are evenly distributed. Cover the bowl tightly with plastic wrap or a lid and transfer it to the refrigerator. The chicken needs to marinate for at least 15 minutes, which is just enough time to let the buttermilk work its tenderizing magic and for the salt to begin seasoning the meat. If you have more time, let it sit for up to 4 hours. You will notice the chicken looks slightly plumper and feels more relaxed when it is ready. For an overnight marinade, use a slightly lighter hand with the hot sauce so it does not become too dominant. While the chicken rests, this is the perfect moment to set up your breading station and start heating the oil.
Phase 2: Mix the Breading
Find a shallow dish with sides, a pie plate is ideal because it gives you plenty of room to work. Combine the flour, paprika, garlic powder, onion powder, cayenne pepper, the second teaspoon of salt, and the remaining half teaspoon of black pepper. Use a whisk to blend everything together thoroughly, breaking up any lumps of spice so the seasoning is evenly dispersed throughout the flour. Take a moment to smell the mixture. It should be fragrant and savory with a hint of warmth from the cayenne. If you prefer a thicker, craggier crust on your chicken, this is the time to double the breading ingredients so you have enough for a luxurious double dredge. Set the dish right next to your bowl of marinated chicken for easy, less messy assembly. Having everything within arm’s reach makes the coating process quick and efficient, especially if you are making a large batch.
Phase 3: Coat the Chicken
Line a baking sheet with a wire rack and have it ready nearby. Remove one chicken tender from the buttermilk marinade, letting the excess liquid drip back into the bowl. You want the chicken wet but not dripping puddles, which would make the flour clumpy. Lay the tender directly into the flour mixture. Using your dry hand, press the flour firmly onto the chicken, turning it over and patting it all around so every crevice is covered. Do not be shy here, really press the flour into the meat to build a solid foundation. Lift the coated tender and give it a gentle shake to let any loose, powdery flour fall away. Place it on the wire rack. Repeat this process with all the remaining tenders. Once they are all breaded, let them sit undisturbed on the rack for 5 to 10 minutes. This is the step so many recipes skip, but it is crucial. During this rest, the flour absorbs moisture from the marinade and transforms into a paste-like layer that will fry up into a supremely bound crust. If you want an even heartier crunch, dip each floured tender back into the buttermilk and then into the flour for a second coat before placing it on the rack.
Phase 4: Heat the Oil
Choose a large, heavy-bottomed pot or a Dutch oven for frying. The heavy bottom helps maintain a steady temperature, which is essential for even cooking. Pour in your vegetable or peanut oil until it reaches a depth of about 2 inches. Attach a deep-fry or instant-read thermometer to the side of the pot, making sure the tip is submerged in the oil but not touching the bottom. Turn the heat to medium-high and let the oil come up to temperature gradually. You are aiming for 350°F (175°C). Be patient here. Rushing the heat often leads to oil that is too hot on the bottom and cooler on top, which can burn the breading before the chicken cooks through. Listen for the oil to begin shimmering and moving in the pot. When the thermometer reads a steady 350°F, you are ready to fry. Keep an eye on the temperature throughout the cooking process, adjusting the heat as needed to keep it between 325°F and 350°F. If you love mastering precise cooking techniques, you might appreciate the gentle touch required in my fluffy Japanese souffle pancakes, another recipe where temperature control makes all the difference.
Phase 5: Fry the Tenders
Working carefully, gently lower 3 to 4 breaded tenders into the hot oil, one at a time. As they enter the pot, you should hear an immediate, lively sizzle. This sound tells you the oil temperature is right and the crust is starting to set. Do not overcrowd the pot; adding too many cold tenders at once will cause the oil temperature to plummet, resulting in greasy, soggy chicken. Fry the tenders for 3 to 4 minutes on the first side, then use tongs to carefully turn them over. The underside should be a deep, rich golden brown. Fry for another 3 to 4 minutes on the second side. The total cooking time will be about 6 to 8 minutes per batch. You are looking for a uniform golden color and an internal temperature that reaches 165°F (74°C) when checked with a meat thermometer. When the tenders are done, transfer them to a plate lined with paper towels to drain any excess oil. Immediately, while the chicken is still glistening with heat, sprinkle a pinch of flaky sea salt over each tender. This finishing salt adds a delightful crunch and amplifies all the flavors in the breading.
Phase 6: Hold and Serve
If you are frying multiple batches, you will want to keep the first batches warm and crispy while the rest cook. Set your oven to its lowest temperature, around 200°F, and place a clean wire rack set over a baking sheet inside. As each batch of tenders comes out of the oil and gets its sprinkle of salt, transfer them to the rack in the oven. The warm, dry air circulates around them, preserving their crunch far better than letting them sit on a plate or covering them with foil would. Arrange all the finished Crispy Buttermilk Chicken Tenders on a serving platter. Surround them with small bowls of your chosen dipping sauces and serve immediately, while they are at their peak of heat and crispness. There is nothing quite like the moment a platter of these hits the table.
Pro Tips and Easy Variations for Your Crispy Buttermilk Chicken Tenders
Pro Tips
- Trust your thermometer above all else. The single most common reason for failed fried chicken is incorrect oil temperature. Too low and the chicken absorbs oil like a sponge; too high and the outside burns before the inside cooks. A thermometer eliminates the guesswork and gives you perfect results every single time.
- Let the breaded tenders rest on a rack, not a plate. Resting on a wire rack allows air to circulate around the entire tender, which helps the flour hydrate evenly into a cohesive paste. If you rest them on a solid surface, the bottoms can become damp and the coating may peel away during frying.
- Use one hand for wet, one hand for dry. Designate one hand to transfer chicken from the buttermilk into the flour, and the other hand to press the flour onto the chicken and move it to the rack. This simple system prevents your fingers from turning into breaded claws and keeps your workspace much cleaner.
- Salt the chicken as soon as it comes out of the oil. Flaky sea salt sprinkled on hot, freshly fried chicken adheres better and dissolves just slightly into the crust, enhancing the flavor more than salt added later. This final touch is what separates good fried chicken from truly exceptional fried chicken.
- For an extra-craggy crust, drizzle a little buttermilk into the flour. After you have dredged a few tenders, take a fork and drizzle a couple of teaspoons of the leftover buttermilk into the remaining flour mixture. Toss it around to create small clumps. These clumps will stick to the chicken and fry into wonderfully crunchy, irregular bits that add serious texture.
Delicious Variations
- Spicy Nashville-Style Tenders. Add 2 teaspoons of cayenne pepper to the buttermilk marinade for a fierier base. After frying, whisk together a few tablespoons of hot frying oil with additional cayenne and a spoonful of dark brown sugar, then brush this spicy oil over the hot tenders. The result is a sticky, spicy, slightly sweet coating that is wildly addictive.
- Air Fryer Version. Prepare and bread the chicken exactly as directed. Preheat your air fryer to 400°F. Spray the breaded tenders generously on all sides with cooking oil and arrange them in a single layer in the air fryer basket. Cook for 10 to 12 minutes, flipping them halfway through, until the internal temperature reaches 165°F and the coating is deeply golden and crisp.
- Herb and Parmesan Crust. Add 1/3 cup of finely grated Parmesan cheese and 1 tablespoon of dried Italian herb blend to the flour mixture. The cheese adds a savory, nutty note and helps create an extra golden brown crust. Serve these with warm marinara sauce for dipping, and suddenly you have a delightful chicken Parmesan hybrid.
- Gluten-Free Adaptation. Replace the all-purpose flour with a good quality cup-for-cup gluten-free flour blend that contains xanthan gum. The breading and resting process remains the same. You can also add a quarter cup of finely ground cornmeal to the flour blend for an even crunchier texture that mimics the original beautifully.
Speaking of golden, crispy breakfast treats, these tenders share a textural philosophy with my blueberry lemon ricotta pancakes, where a crisp exterior gives way to a tender, flavorful interior. Mastering that contrast is what great cooking is all about.
Serving Suggestions for a Perfect Dinner
The classic way to serve these tenders is piled high on a large platter with an assortment of dipping sauces: cool, herby ranch dressing, sweet and tangy honey mustard, and simple ketchup for the purists. Add a side of waffle fries or sweet potato fries, a generous scoop of creamy coleslaw, and you have a spread that feels like a celebration. For drinks, an ice-cold lemonade or a crisp lager cuts through the richness beautifully. If you are setting up a buffet, keep the tenders on a wire rack over a baking sheet set over a low sterno flame to maintain their crunch without getting soggy.
These tenders are also incredibly versatile beyond the platter. Tuck them into soft slider buns with dill pickle chips, shredded lettuce, and a generous swipe of spicy mayo for the best chicken sandwiches you have ever made at home. Slice them and lay them over a crunchy chopped salad with a honey-mustard vinaigrette for a dinner that feels lighter but still satisfies. For a bigger crowd, simply double or triple the recipe. You can hold the cooked tenders in a 200°F oven for up to an hour without sacrificing much texture, which makes them a stress-free option for parties and game day gatherings. I have served these at Super Bowl parties and birthday dinners alike, and they disappear faster than anything else on the table.
Nutrition Information
(Approximate per serving, 4 servings total) Calories: 420, Fat: 16g, Carbohydrates: 28g, Protein: 38g, Fiber: 1g, Sugar: 2g, Sodium: 680mg. Nutritional values are estimates only.
Storage and Make-Ahead Instructions
- Refrigerator: Store any leftover tenders in an airtight container in the refrigerator for up to 4 days. The crust will soften somewhat, but you can bring it back to life with the right reheating method. Place a paper towel in the container to absorb excess moisture and help preserve texture.
- Freezer: These tenders freeze wonderfully. Arrange the fully cooked and cooled tenders on a parchment-lined baking sheet and freeze until solid, about 2 hours. Then transfer them to a heavy-duty freezer bag, press out the air, and seal tightly. They will keep for up to 3 months. Freezing them flat first prevents them from sticking together into an unbreakable block.
- Reheating: For the crispiest results, reheat leftover refrigerated tenders in a 400°F oven for 8 to 10 minutes, flipping once, until heated through and the crust is sizzling again. From frozen, add a few extra minutes. An air fryer at 375°F for 4 to 5 minutes also works brilliantly. Avoid the microwave, which will steam the coating and turn it unpleasantly soft.
- Make-Ahead: You can marinate the chicken in the buttermilk mixture up to 24 hours in advance and keep it covered in the refrigerator. You can also mix the breading dry ingredients and store them in a sealed container at room temperature. When you are ready to cook, all you have to do is dredge, rest, and fry. This front-loaded prep makes dinnertime wonderfully smooth.
Your Crispy Buttermilk Chicken Tenders Questions Answered
Can I use chicken breasts instead of tenderloins?
Absolutely. Buy boneless, skinless chicken breasts and slice them lengthwise into strips about 1 inch wide. Try to keep the strips as even in thickness as possible so they cook at the same rate. You may need to trim away any particularly thin or thick ends to achieve uniform pieces.
Why is my breading falling off during frying?
This usually happens for two reasons: the chicken was too wet when it went into the flour, or you skipped the resting step after breading. Letting the coated tenders sit on a rack for 5 to 10 minutes allows the flour to hydrate and adhere like glue to the meat. Also, make sure your oil is at 350°F before you add the chicken, a correct temperature sets the crust instantly.
Can I bake these instead of frying?
Yes, you can bake them. Place the breaded tenders on a greased wire rack set over a rimmed baking sheet. Spray the tops generously with cooking oil. Bake in a preheated 425°F oven for 18 to 20 minutes, flipping once halfway through, until the internal temperature reaches 165°F and the coating is golden and crunchy. The texture will be slightly different from frying but still very satisfying.
What is the best oil for frying chicken tenders?
Neutral oils with a high smoke point work best. Vegetable oil, canola oil, and peanut oil are all excellent choices. Peanut oil imparts a slightly nutty flavor and is a favorite in many Southern kitchens. Avoid olive oil or butter, which have lower smoke points and can burn, giving the chicken an acrid taste.
How do I know when the chicken is fully cooked?
The most reliable method is to use an instant-read meat thermometer. Insert it into the thickest part of a tender; it should register 165°F (74°C). Visually, the juices should run clear and the meat should be opaque white all the way through with no pinkness. The crust should be a deep, attractive golden brown.
Can I make these dairy-free?
Yes. Replace the buttermilk with an equal amount of unsweetened, plain dairy-free milk, such as almond or oat milk, mixed with 1½ tablespoons of lemon juice or white vinegar. Let the mixture sit for 10 minutes to curdle before using. The results are still tender and well-seasoned, though the tang will be slightly milder.
How can I double this recipe for a crowd?
Simply multiply all the ingredients by two. Fry in multiple batches, being careful not to overcrowd the pot each time. Hold the cooked tenders in a 200°F oven on a wire rack over a baking sheet while you fry the rest. This keeps them warm and crispy until you are ready to serve everything at once.
What dipping sauces go best with these tenders?
Classic choices include buttermilk ranch, honey mustard, and ketchup. For something different, try a spicy sriracha mayo, a smoky chipotle crema, or a sweet and tangy barbecue sauce. The tenders are so well-flavored that they pair beautifully with a wide range of sauces, so feel free to offer a selection.
My tenders came out greasy. What went wrong?
Oil that is too cool is the most common culprit. When the oil temperature drops below 325°F, the chicken absorbs the oil rather than searing immediately. Monitor the temperature throughout frying and adjust the heat to keep it steady. Also, be sure to drain the fried tenders on paper towels briefly to wick away surface oil, then move them to a rack if holding them.
More Incredible American Recipes to Try
If this crispy buttermilk chicken tenders recipe has you in the mood for more classic American comfort food, I have a few favorites that deserve a spot on your table. For a breakfast or brunch that feels just as indulgent and satisfying, my blueberry lemon ricotta pancakes are a revelation. They cook up with golden, lacy edges and a tender, creamy interior thanks to the ricotta, and the burst of blueberry paired with bright lemon is pure sunshine on a plate. It is the kind of recipe that makes a regular Saturday morning feel like a special occasion.
On the heartier side, if you are drawn to recipes that fill the house with incredible aromas and feed a hungry crowd, you might explore slow-cooked dishes that build deep, complex flavor. My Moroccan chicken tagine is a beautiful example of how simple ingredients, given the right technique and time, can transform into something truly memorable. It shares a similar spirit with these tenders: the joy of making something from scratch that tastes better than anything you could order out. And for a completely different but equally beloved American classic, consider learning to make fluffy Japanese souffle pancakes. They require a delicate touch and attention to temperature, not unlike perfecting your fried chicken game. Each of these recipes rewards patience and care in the best possible way.
The Story Behind This Crispy Buttermilk Chicken Tenders
Chicken tenders, at their core, are a distinctly American invention with roots that trace back to the 1970s at a New Hampshire diner called the Puritan Backroom. The story goes that the restaurant was looking for a way to use up the small, tender strips of meat found on the underside of chicken breasts, which were often discarded or used for stock. They started breading and frying them, serving them with a sweet dipping sauce, and the chicken tender was born. From there, the concept spread across the country, becoming a staple on children’s menus, sports bar lineups, and fast-food boards alike. The appeal was immediate and enduring: an all-white-meat, boneless piece of chicken with maximum crunchy surface area and no bones to navigate.
What makes a homemade buttermilk version so special is the return to real ingredients and patient technique. Early versions were simple, but over time, the buttermilk soak became the gold standard for achieving that signature tang and tenderness. In my own kitchen, this recipe has evolved through many Friday night dinners and weekend experiments with my family. It represents everything I love about cooking: the chance to take something familiar and elevate it with care, not complexity. When I make these tenders, I think about the diners that started it all, about the kids who grew up dipping them in ketchup, and about my own children who now request them by name. This is food that connects us, one crunchy bite at a time.
Pin This Crispy Buttermilk Chicken Tenders Recipe for Later
Love this recipe? Save it to your favorite Pinterest board so you can find it again easily. Share it with friends and family who would enjoy making it too.
I truly hope this crispy buttermilk chicken tenders recipe brings as much joy to your kitchen as it has to mine. There is something so satisfying about pulling a batch of perfectly golden, crunchy tenders out of the pan and watching everyone gather around. If you make these, I would love to hear how they turned out for you. Leave a comment below and let me know if you tried the Nashville-style variation or if you discovered a new favorite dipping sauce pairing. Happy cooking.
Crispy Buttermilk Chicken Tenders
Ingredients
Method
- In a large bowl, combine chicken tenderloins, buttermilk, hot sauce, 1 tsp salt, and ½ tsp pepper. Cover and refrigerate for at least 15 minutes while you prepare the breading. For deeper flavor, marinate up to 4 hours.
- In a shallow dish or pie plate, whisk together the flour, paprika, garlic powder, onion powder, cayenne, 1 tsp salt, and ½ tsp pepper until evenly combined.
- Line a baking sheet with wire rack. Remove a tender from the buttermilk, letting excess drip off, then press firmly into the flour mixture on all sides. Shake off any loose flour and place on the rack. Repeat with all tenders. Let them sit for 5–10 minutes — this helps the coating adhere.
- In a large heavy-bottomed pot or Dutch oven, pour oil to a depth of about 2 inches. Heat over medium-high until a deep-fry or instant-read thermometer registers 350°F (175°C). Carefully monitor the temperature.
- Working in batches of 3–4, gently lower tenders into the hot oil. Fry for 3–4 minutes per side, until deep golden brown and the internal temperature reaches 165°F (74°C). Transfer to a paper towel-lined plate and immediately sprinkle with flaky sea salt.
- Arrange the crispy chicken tenders on a platter with your choice of dipping sauces. Enjoy hot.
Disclosure: This post may contain affiliate links. If you purchase through our links we may earn a small commission at no extra cost to you.
If you made this Crispy Buttermilk Chicken Tenders, please leave a comment below and let me know how it turned out.