Classic Chicken Pot Pie with Flaky Butter Crust Recipe, Easy American Dinner in 1 Hour
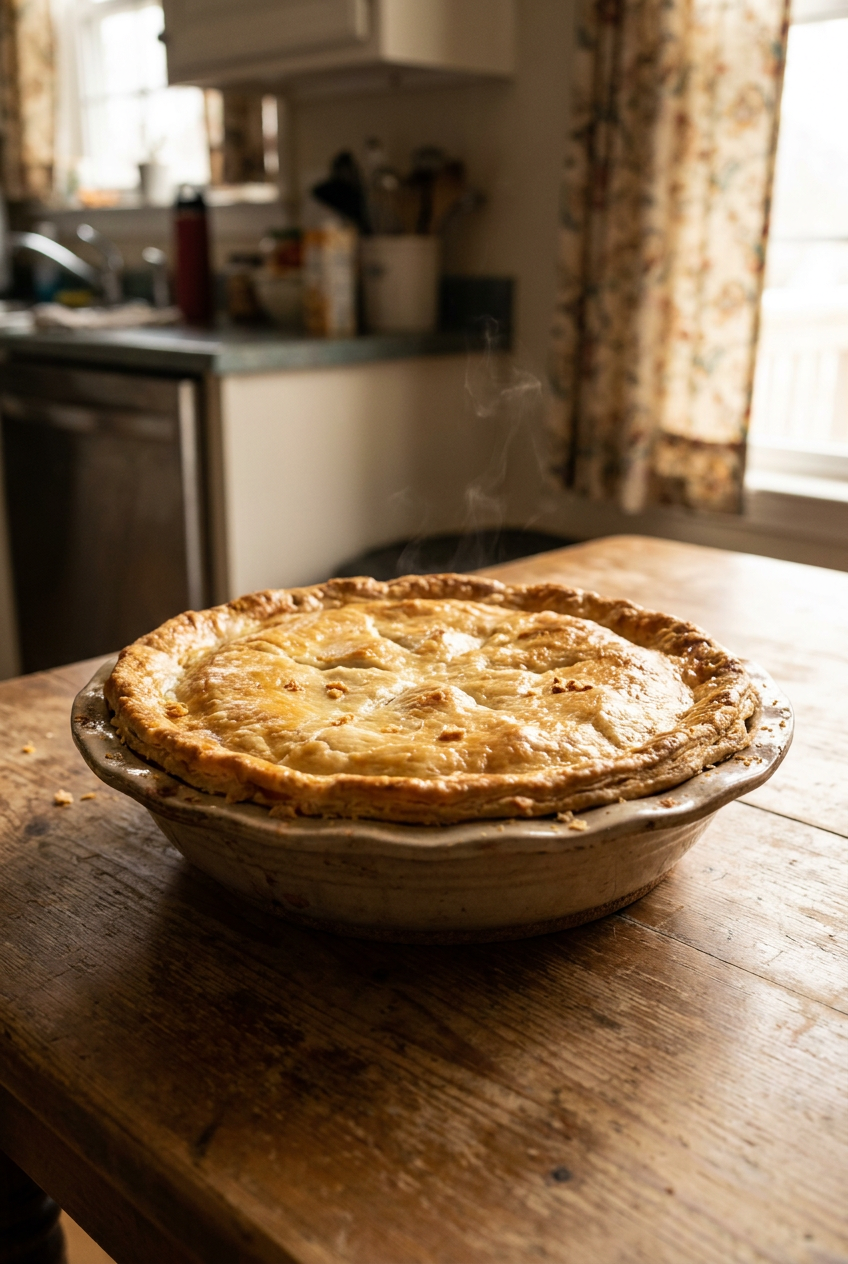
Table of Contents
- Classic Chicken Pot Pie with Flaky Butter Crust: A golden, flaky crust envelops a creamy, herb-infused filling of tender chicken and garden vegetables, pure comfort in every bite.
- Why You Will Love This Classic Chicken Pot Pie with Flaky Butter Crust Recipe
- Your Simple Ingredients for This Flaky Butter Chicken Pot Pie
- How to Make Perfect Classic Chicken Pot Pie with Flaky Butter Crust
- Pro Tips and Easy Variations for Your Chicken Pot Pie
- Serving Suggestions
- Nutrition Information
- Storage and Make-Ahead Instructions
- Your Classic Chicken Pot Pie with Flaky Butter Crust Questions Answered
- More Incredible American Recipes to Try
- The Story Behind This Recipe
- Pin This Recipe for Later
Classic Chicken Pot Pie with Flaky Butter Crust: A golden, flaky crust envelops a creamy, herb-infused filling of tender chicken and garden vegetables, pure comfort in every bite.
There are certain recipes that feel like a warm hug on a chilly evening, and this classic chicken pot pie with flaky butter crust recipe has been my personal go-to for as long as I can remember. The first time I truly nailed a from-scratch pot pie was on a rainy Sunday in my tiny apartment kitchen, flour dusted across every surface and a small mountain of dirty bowls in the sink. When I pulled that golden dome of pastry out of the oven and saw the creamy filling bubbling through the steam vents, I knew I had made something special. The way the buttery crust shattered delicately under my fork, giving way to that velvety sauce loaded with tender chicken and sweet carrots, transported me straight back to the best childhood dinners. This dish isn’t just a meal; it is a memory you create with your own hands.
What sets this classic chicken pot pie apart from every other version is the deeply savory filling built on properly seared chicken and a roux slowly coaxed from butter, flour, and homemade-tasting broth. So many recipes skip the step of browning the meat or rush the sauce, leaving you with a pale, bland interior. Here, we take the time to build layers of flavor, letting the carrots, celery, and onion soften and sweeten before the flour goes in, then whisking in the liquid until the sauce becomes rich and glossy. The crust too demands respect: we use very cold butter cut into the flour by hand, creating those distinct pockets of fat that puff into hundreds of delicate, flaky sheets. If you enjoy recipes where technique makes all the difference, you will appreciate the careful approach we take, much like when I prepare my Moroccan chicken tagine and spend a few extra minutes building a fragrant base.
This recipe is perfect for anyone who wants to bring a taste of honest, old-fashioned cooking to their table. It works beautifully for a family Sunday supper, a festive holiday meal, or any evening when you want to spoil the people you love. Because it serves six generously, you will have enough for a small gathering, or you can enjoy leftovers for days (the flavors only get better). If you have never made a double-crust pot pie from scratch before, do not be intimidated. Every step is completely manageable, and I have packed in plenty of tips to guide you to success. Once you taste that first forkful with its flaky top, tender bottom, and luscious filling, you will understand exactly why this classic chicken pot pie with flaky butter crust recipe is worth every minute of effort.
Why You Will Love This Classic Chicken Pot Pie with Flaky Butter Crust Recipe
- That impossibly flaky, buttery crust. The all-butter pastry, made with cold butter and a light hand, shatters into golden layers that melt on your tongue. It contrasts beautifully with the rich filling and makes every bite feel like a celebration.
- A deeply savory, herb-scented filling. Searing the chicken thighs until deeply golden and cooking the vegetables until they begin to caramelize gives the gravy a robust, almost roasted flavor. Fresh thyme ties everything together with a gentle earthiness that dried herbs simply cannot match.
- No mushy vegetables or watery sauce. By thickening the sauce to the perfect consistency and adding frozen peas right at the end, every vegetable retains its character. The carrots have a pleasant bite, the celery stays tender-crisp, and the peas pop with bright sweetness.
- Completely from scratch, but totally doable. The recipe breaks down into clear phases, and you can even make the crust and filling ahead of time. With each step explained in detail, you will feel confident and in control from start to finish.
- Versatile and adaptable to what you have on hand. You can swap in leftover rotisserie chicken or even make individual pot pies for a charming presentation. The filling welcomes mushrooms, potatoes, or extra herbs, so you can truly make it your own.
- An instant mood lifter and crowd pleaser. The moment you set this golden pie on the table, everyone lights up. It is the kind of food that makes people feel cared for, and there is no better way to show love than with a homemade meal.
Your Simple Ingredients for This Flaky Butter Chicken Pot Pie
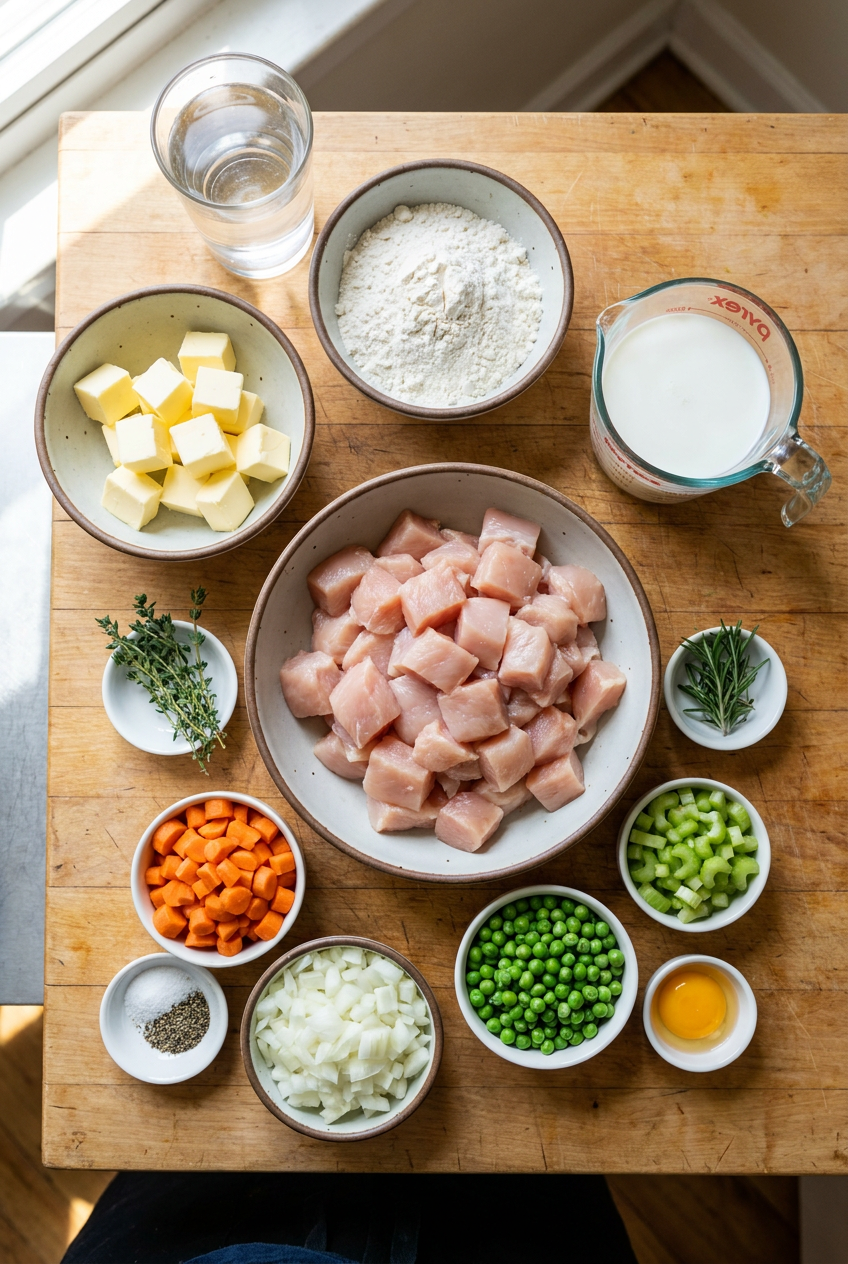
For the Crust
- 2 1/2 cups all-purpose flour, plus extra for rolling
- 1 tsp salt
- 1 cup (2 sticks) cold unsalted butter, cut into small cubes
- 6 to 8 tbsp ice water
For the Filling
- 1.5 lbs boneless, skinless chicken thighs, cut into bite-sized pieces
- 3 tbsp unsalted butter
- 1 medium yellow onion, diced
- 3 carrots, peeled and sliced into coins
- 3 stalks celery, sliced
- 1/3 cup all-purpose flour
- 2 cups low-sodium chicken broth
- 1/2 cup heavy cream
- 1 cup frozen peas, no need to thaw
- 1 tbsp fresh thyme leaves, or 1 tsp dried
- 1 tsp salt, plus more to taste
- 1/2 tsp black pepper
- 1 egg, beaten, for egg wash
Ingredient Notes
All-purpose flour. This serves as the foundation of both the crust and the roux that thickens the filling. Use a standard unbleached flour for the most reliable results. If you need a gluten-free option, a quality 1-to-1 gluten-free flour blend works well, though the crust may be slightly more delicate to roll.
Cold unsalted butter. The butter creates the flaky layers in the crust; its water content turns to steam as it bakes, lifting the dough into airy sheets. Keep the butter as cold as possible, popping it in the freezer for 10 minutes after cubing if your kitchen is warm. Salted butter can be used in a pinch, but then reduce the added salt in the crust by a generous pinch.
Ice water. Icy water brings the dough together without warming the butter. I like to keep a small bowl of water with ice cubes nearby and add it one tablespoon at a time. The exact amount depends on the humidity in your kitchen, so trust the look of the dough rather than a strict measurement.
Boneless, skinless chicken thighs. Thighs stay juicy and tender even after baking in the pie, while chicken breast can dry out and become stringy. Look for thighs that are uniform in size so they cook evenly. If you prefer white meat, you can use breasts cut into similar pieces, but watch them closely during searing to avoid overcooking.
Low-sodium chicken broth. Using a reduced-sodium broth lets you control the salt level in the filling. A rich homemade stock is even better and gives an incredible depth of flavor. If you only have regular broth, taste before adding the full teaspoon of salt to the sauce.
Heavy cream. Cream adds luxurious body and a silky mouthfeel to the gravy. You can substitute whole milk in a pinch, but the sauce will be slightly thinner and less rich. Avoid low-fat milk, as it can curdle when simmered.
Fresh thyme. Fresh thyme brings a floral, woodsy note that defines the classic pot pie flavor. If using dried, rub it between your fingers to release the oils before adding. You can also swap in fresh rosemary or sage for a different herbal character.
Frozen peas. Adding them straight from the freezer keeps them bright green and slightly crisp. There is no need to thaw them ahead, as they will heat through perfectly in the hot filling and during baking.
How to Make Perfect Classic Chicken Pot Pie with Flaky Butter Crust
Prepare the Pie Dough
In a large mixing bowl, whisk together the flour and salt until evenly combined. Scatter the cold butter cubes over the flour and toss them gently to coat. Using a pastry cutter or your fingertips, work the butter into the flour quickly, pressing the pieces into flat, irregular flakes. Stop when the mixture looks like coarse meal with plenty of pea-sized butter bits still visible; those visible chunks are what create the flaky texture in the finished crust. Drizzle in 1 tablespoon of ice water at a time, stirring with a fork after each addition, until the dough starts to hold together when you squeeze a handful. It should feel slightly shaggy but not sticky. Turn the dough onto a clean surface, gather it into a ball, and divide it into two equal pieces. Flatten each piece into a disk about 1 inch thick, wrap tightly in plastic wrap, and refrigerate for at least 30 minutes. Chilling relaxes the gluten and firms up the butter, making the dough much easier to roll out later. For an extra flaky result, handle the dough as little as possible and keep everything cold.
Cook the Chicken and Vegetables
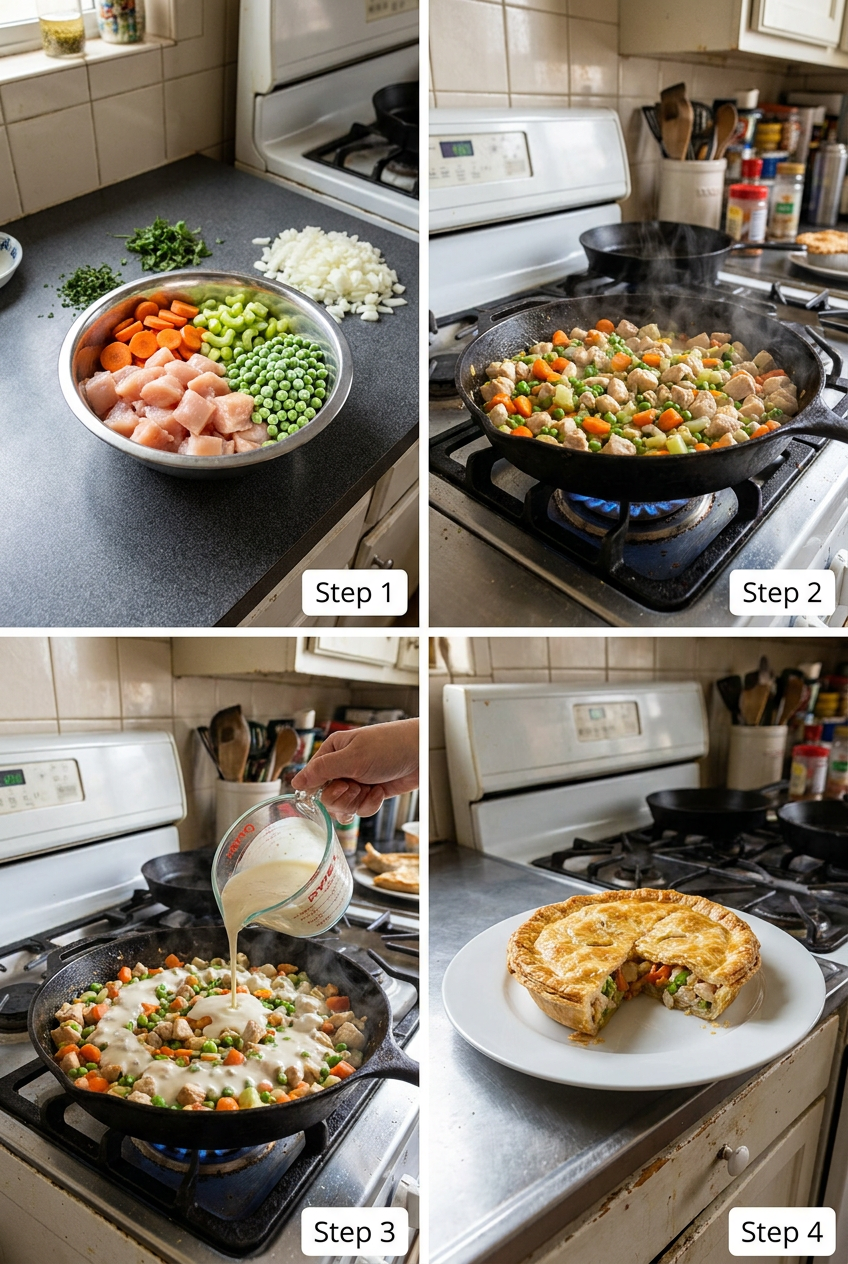
While the dough chills, preheat your oven to 400°F (200°C). Place a large skillet over medium-high heat and melt 1 tablespoon of the butter. Season the chicken pieces with a pinch of salt and pepper, then add them to the hot pan in a single layer. Let them sear undisturbed for 3 to 4 minutes per side until deeply golden and cooked through, reaching an internal temperature of 165°F (74°C). You should hear a lively sizzle and see a nice brown crust forming. If your skillet is not large enough to hold all the chicken without crowding, work in two batches so the meat browns rather than steams. Transfer the cooked chicken to a plate and set aside. In the same skillet, add the remaining 2 tablespoons of butter along with the diced onion, carrot coins, and sliced celery. Cook over medium heat, stirring occasionally, until the vegetables soften and the onion turns translucent, about 5 to 7 minutes. You will notice the aroma becoming sweet and savory as the vegetables release their natural sugars.
Make the Creamy Sauce
Sprinkle the 1/3 cup of flour evenly over the softened vegetables and stir constantly for 1 to 2 minutes. This step is crucial because it cooks out the raw flour taste and prepares the roux to thicken properly. The mixture will look dry and pasty at first, but keep stirring. Slowly pour in the chicken broth while whisking continuously to prevent lumps from forming. The moment the liquid hits the hot pan, you will see it immediately begin to thicken. Add the heavy cream and bring the sauce to a gentle simmer, continuing to whisk. Let it bubble softly for 3 to 4 minutes until it coats the back of a spoon thickly and a swipe with your finger leaves a clean trail. Stir in the seared chicken pieces, frozen peas, thyme, 1 teaspoon salt, and black pepper. Remove the pan from the heat and allow the filling to cool slightly while you roll out the dough. A warm filling is fine, but hot filling will start to melt the butter in the crust, so give it at least 15 minutes to lose the intense heat. If you want a completely foolproof bottom crust, you can even spread the filling on a rimmed baking sheet to cool more quickly.
Assemble the Pot Pie
Lightly flour a clean work surface and one of the chilled dough disks. Roll it out into a circle about 12 inches in diameter, turning and dusting lightly with flour as needed to prevent sticking. Carefully transfer the dough to a 9-inch deep-dish pie pan, easing it into the corners without stretching. Leave the 1-inch overhang draping over the edge. Spoon the cooled filling into the crust, mounding it slightly in the center. Roll out the second dough disk in the same way and drape it over the filling. Trim any excess dough from the top crust, leaving about a 1-inch overhang as well. Fold the overhang of the top crust over the bottom crust and crimp the edges together with your fingers or a fork to seal. Using a sharp knife, cut several slits in the top crust to allow steam to escape. Brush the entire surface generously with the beaten egg, making sure to get into the crimped edges. This egg wash gives the pie a glossy, deeply golden finish that makes it look as good as it tastes. At this point, if the dough feels soft or sticky, pop the assembled pie into the refrigerator for 15 minutes to firm up; this extra cold start encourages maximum flakiness.
Bake to Golden Perfection
Set the pie on a baking sheet lined with parchment or foil to catch any drips. Place it in the preheated 400°F oven and bake for 20 minutes. This initial blast of high heat sets the crust and starts the browning. Then reduce the oven temperature to 350°F (175°C) and continue baking for 25 to 30 minutes more. You will know the pie is done when the crust is a deep, even golden brown and the filling is actively bubbling up through the vents. If the edges of the crust begin to brown too quickly before the center is fully baked, loosely cover them with strips of aluminum foil. When you tap the top crust, it should feel firm and crispy, not soft or doughy. Remove the pie from the oven and place it on a wire rack. Let it rest for at least 15 minutes before slicing. This brief wait allows the filling to set up just enough so it doesn’t run everywhere when you cut into it. A glass pie dish can be helpful here because you can peek at the underside to see if the bottom crust has browned properly. If it still looks pale, slide the pie onto the lowest rack for an additional 5 minutes. I sometimes think of this gentle baking process as similar to making fluffy Japanese souffle pancakes, where patience and steady heat are rewarded with a perfect texture.
Pro Tips and Easy Variations for Your Chicken Pot Pie
Pro Tips
- Par-bake the bottom crust for a guaranteed crisp base. Blind bake the empty bottom crust for 10 minutes at 400°F before adding the filling. Prick the dough all over with a fork, line it with parchment paper, and fill with pie weights or dried beans. This creates an extra barrier against sogginess, especially if you serve the pie after a day of refrigeration.
- Cool the filling completely if you have time. Warm filling is fine, but completely cooled filling ensures the butter in the bottom crust stays cold right up until it hits the oven. Spread the filling in a thin layer on a baking sheet and let it come to room temperature for the best results.
- Use high-quality, well-chilled butter. European-style butter with a higher fat content produces an even more flaky and flavorful crust. Freeze the butter for 10 minutes after cubing to keep it exceptionally cold.
- Don’t skip the egg wash. A thorough coat of beaten egg mixed with a teaspoon of water creates that beautiful mahogany sheen. Pay attention to the crimped edges, as they can look pale without it.
- Bake on a preheated baking stone or steel. Placing the pie on a hot surface helps the bottom crust cook through and brown beautifully, much like a pizza stone works its magic. Just be cautious when moving the pie in and out of the oven.
- Let the pie rest before you slice. Cutting into a pot pie straight from the oven causes the filling to spill out in a soupy mess. A 15 to 20 minute rest on a cooling rack gives the starch in the sauce time to firm up and the pastry time to settle.
Delicious Variations
- Rotisserie chicken shortcut. Swap the seared chicken thighs for 3 cups of shredded rotisserie chicken. Skip the browning step and stir the cooked chicken into the sauce along with the peas and thyme. The filling comes together even faster without sacrificing that home-cooked taste.
- Mushroom and herb burst. Add 1 cup of sliced cremini or button mushrooms to the skillet along with the carrots and celery. The mushrooms release savory juices that deepen the gravy’s flavor, and a pinch of fresh rosemary adds a lovely woodsy note.
- Puff pastry topper. Replace the top pie crust with a sheet of thawed puff pastry. Drape it over the filled bottom crust, trim the overhang, and brush with egg wash. The puff pastry puffs dramatically and creates a shatteringly crisp lid that contrasts beautifully with the creamy interior.
- Individual pot pies. Divide the filling among six 8-ounce ramekins or small pie dishes. Cut the rolled-out dough into rounds slightly larger than the dishes, top each one, and crimp the edges. Reduce the baking time to 25 to 30 minutes total at 375°F, and watch for the filling to bubble and the crust to turn golden.
- Lighter creamy sauce. Use whole milk and a splash of chicken broth instead of heavy cream for a slightly less rich but still comforting gravy. The result is still creamy and satisfying, and you won’t feel weighed down after a generous slice.
If you enjoy building meals around a beautifully cooked pastry or batter, you might also love these blueberry lemon ricotta pancakes for a sweet, brunch-worthy treat that uses ricotta for incredible tenderness.
Serving Suggestions for a Perfect Dinner
A slice of chicken pot pie is a complete meal on its own, but a few simple sides can round out the plate beautifully. I love pairing it with a crisp arugula salad dressed simply in lemon juice, olive oil, and a pinch of salt. The peppery greens and bright acidity cut through the richness of the buttery crust and creamy filling, refreshing your palate between bites. For a more substantial spread, lightly steamed green beans with a drizzle of brown butter or roasted asparagus with a shower of Parmesan add a lovely green element that feels fresh and intentional. When it comes to drinks, a chilled glass of unoaked Chardonnay or a crisp dry cider complements the savory notes without overwhelming them. If you prefer something nonalcoholic, a glass of sparkling water with a squeeze of lemon keeps things light.
This dish shines at casual family dinners and holiday gatherings alike. For a cozy fall evening, set the whole pie on a trivet in the center of the table and let everyone serve themselves. It travels well too, so you can bring it to a potluck or a friend who could use a home-cooked meal. To scale up for a crowd, you can easily double the filling recipe and bake two pies, or prepare a large rectangular baking dish casserole-style with a single sheet of pastry on top. Just adjust the baking time and watch for that golden finish. Whether it’s a weeknight when you need comfort or a special occasion that calls for something from the heart, this pot pie never disappoints.
Nutrition Information
(Approximate per serving, 6 servings total) Calories: 620, Fat: 34g, Carbohydrates: 48g, Protein: 32g, Fiber: 4g, Sodium: 820mg. Nutritional values are estimates only.
Storage and Make-Ahead Instructions
- Refrigerator: Cover the baked pie tightly with plastic wrap or transfer slices to an airtight container. Store in the refrigerator for up to 4 days. The crust will soften slightly as it sits, but the filling remains wonderfully creamy. A quick reheat in the oven helps revive the crispness.
- Freezer: Assemble the entire pie as instructed but do not add the egg wash. Wrap the unbaked pie tightly first in plastic wrap and then in a layer of heavy-duty aluminum foil. Freeze for up to 3 months. When you are ready to bake, unwrap the pie, brush with egg wash, and bake from frozen at 375°F for about 70 minutes, or until the crust is deep golden and the filling reaches an internal temperature of 165°F. Placing a pie crust shield over the edges after 40 minutes prevents over-browning.
- Reheating: For the best texture, reheat individual slices in a 350°F oven for 10 to 15 minutes until warmed through and the crust crisps again. If you are in a hurry, the microwave will work in about 2 minutes, though the crust will lose its flaky crispness. Covering the plate with a damp paper towel can help prevent the pastry from becoming rubbery in the microwave.
- Make-Ahead: Both the pie dough and the filling can be prepared in advance. The dough disks can be wrapped tightly and refrigerated for up to 3 days or frozen for up to 1 month. The filling can be cooked, cooled, and stored in an airtight container in the refrigerator for up to 2 days. When you are ready to bake, assemble the pie with the chilled dough and cold filling, then bake as directed, adding a few extra minutes to account for the cold start.
Your Classic Chicken Pot Pie with Flaky Butter Crust Questions Answered
Q: Can I make this recipe with leftover rotisserie chicken?
A: Yes, absolutely. Skip the searing step and add 3 cups of shredded cooked chicken to the sauce along with the peas and thyme. Since the chicken is already seasoned and cooked, your filling will come together even faster.
Q: Why does my bottom crust turn out soggy, and how can I prevent it?
A: Sogginess usually happens when the filling is too hot or the bottom crust is not properly baked. Cool the filling before adding it to the pie, blind bake the crust for 10 minutes before filling, and bake the pie on the lowest oven rack. These steps create a crisp, golden bottom every time.
Q: Can I make individual pot pies instead of one large pie?
A: Definitely. Divide the filling among six 8-ounce ramekins, cut the rolled dough into rounds slightly larger than the dishes, and top them. Reduce the baking time to 25 to 30 minutes total at 375°F, or until the crust is golden and the filling bubbles.
Q
Classic Chicken Pot Pie with Flaky Butter Crust
classic chicken pot pie with flaky butter crust recipe made easy at home. A golden, flaky crust envelops a creamy, herb-infused filling of tender chicken and
Ingredients
Method
- In a large bowl, whisk flour and salt. Add cold butter cubes and toss to coat. Using a pastry cutter or your fingertips, work butter into flour until mixture resembles coarse meal with some pea-sized pieces. Drizzle ice water over mixture 1 tablespoon at a time, stirring with a fork until dough begins to form clumps. Gather into a ball, divide in half, flatten into disks, wrap in plastic, and refrigerate for at least 30 minutes.
- Preheat oven to 400°F (200°C). In a large skillet over medium-high heat, melt 1 tablespoon butter. Season chicken pieces with a pinch of salt and pepper, then sear until golden and cooked through, reaching an internal temperature of 165°F (74°C), about 5-6 minutes. Remove to a plate. In the same skillet, add remaining 2 tablespoons butter, onion, carrots, and celery. Cook until softened, about 5-7 minutes.
- Sprinkle 1/3 cup flour over the softened vegetables and stir constantly for 1-2 minutes to cook out the raw taste. Slowly pour in chicken broth while whisking to prevent lumps. Add heavy cream and bring to a simmer. Cook until thickened, about 3-4 minutes. Stir in cooked chicken, frozen peas, thyme, 1 tsp salt, and pepper. Remove from heat and let cool slightly.
- On a lightly floured surface, roll one dough disk into a 12-inch circle. Ease it into a 9-inch deep-dish pie pan, leaving a 1-inch overhang. Pour in the cooled filling. Roll out the second disk and place over filling. Trim excess dough, fold overhang over the top crust, and crimp edges decoratively. Cut several slits in the top crust to vent steam. Brush with beaten egg for a glossy golden finish.
- Place pie on a baking sheet to catch any drips. Bake at 400°F for 20 minutes, then reduce heat to 350°F (175°C) and continue baking for 25-30 minutes, or until crust is deep golden and filling is bubbly. If edges brown too quickly, cover with foil. Let rest at least 15 minutes before slicing.
Disclosure: This post may contain affiliate links. If you purchase through our links we may earn a small commission at no extra cost to you.
If you made this Classic Chicken Pot Pie with Flaky Butter Crust, please leave a comment below and let me know how it turned out.
Classic Chicken Pot Pie with Flaky Butter Crust
Ingredients
Method
- In a large bowl, whisk flour and salt. Add cold butter cubes and toss to coat. Using a pastry cutter or your fingertips, work butter into flour until mixture resembles coarse meal with some pea-sized pieces. Drizzle ice water over mixture 1 tablespoon at a time, stirring with a fork until dough begins to form clumps. Gather into a ball, divide in half, flatten into disks, wrap in plastic, and refrigerate for at least 30 minutes.
- Preheat oven to 400°F (200°C). In a large skillet over medium-high heat, melt 1 tablespoon butter. Season chicken pieces with a pinch of salt and pepper, then sear until golden and cooked through, reaching an internal temperature of 165°F (74°C), about 5-6 minutes. Remove to a plate. In the same skillet, add remaining 2 tablespoons butter, onion, carrots, and celery. Cook until softened, about 5-7 minutes.
- Sprinkle 1/3 cup flour over the softened vegetables and stir constantly for 1-2 minutes to cook out the raw taste. Slowly pour in chicken broth while whisking to prevent lumps. Add heavy cream and bring to a simmer. Cook until thickened, about 3-4 minutes. Stir in cooked chicken, frozen peas, thyme, 1 tsp salt, and pepper. Remove from heat and let cool slightly.
- On a lightly floured surface, roll one dough disk into a 12-inch circle. Ease it into a 9-inch deep-dish pie pan, leaving a 1-inch overhang. Pour in the cooled filling. Roll out the second disk and place over filling. Trim excess dough, fold overhang over the top crust, and crimp edges decoratively. Cut several slits in the top crust to vent steam. Brush with beaten egg for a glossy golden finish.
- Place pie on a baking sheet to catch any drips. Bake at 400°F for 20 minutes, then reduce heat to 350°F (175°C) and continue baking for 25-30 minutes, or until crust is deep golden and filling is bubbly. If edges brown too quickly, cover with foil. Let rest at least 15 minutes before slicing.